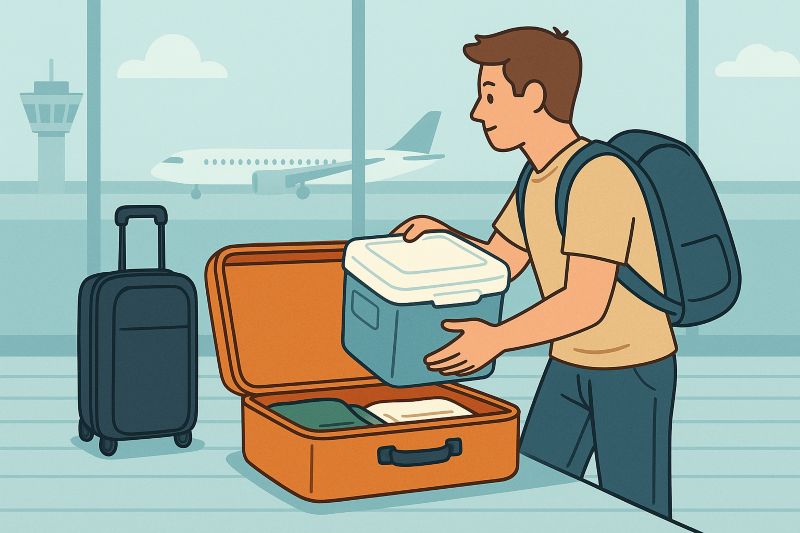
I can’t tell you how many times I’ve been at the airport, staring at my suitcase and wondering if my carefully packed frozen goodies would make it to the other side without turning into a soupy mess. For me, it’s usually something special — like marinated kebabs my mom made, or a batch of lamb chops I found at a little butcher shop abroad that I just had to bring home.
If you’ve ever been in that boat (or plane), you’re not alone. People travel with frozen meat all the time — whether it’s for a family gathering, a holiday treat, or simply because you can’t get that exact cut or flavor where you live.
The good news? Yes, you can bring frozen meat on a plane. But… there are rules, and if you don’t play by them, you might end up waving goodbye to your precious ribeye at security or customs. I’ve learned the hard way, and trust me — nothing stings more than watching a TSA officer toss your frozen steak into the “confiscated items” bin.
In this guide, I’ll walk you through exactly how to do it — from TSA and airline rules to the best way to pack meat so it actually stays frozen. I’ll also share some real-life packing hacks I’ve picked up over the years, along with a few travel-friendly products that can save your bacon. Literally.
TSA & Airline Rules for Frozen Meat
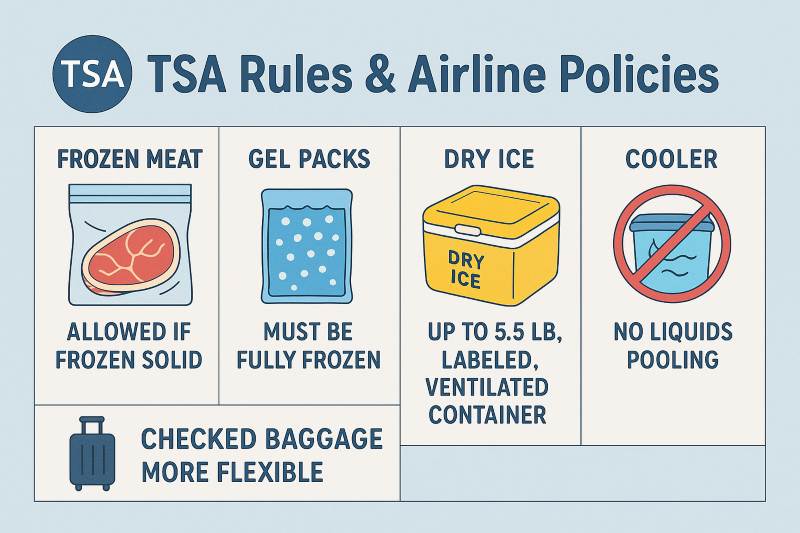
Here’s the thing: TSA doesn’t actually have a problem with you bringing frozen meat. Their main concern is whether it’s solid when you go through security. If it’s completely frozen, it’s treated like any other solid food. The moment it starts thawing and turns into a liquid-y mess? That’s when you might run into issues — especially with carry-on.
Carry-On Rules
If you’re flying within the United States, TSA says frozen meat is fine in your carry-on as long as there’s no liquid pooling in the package. That means no blood, melted ice, or marinades sloshing around.
-
Ice packs or gel packs are allowed in carry-on only if they’re completely frozen solid at screening. If they’re even slightly mushy, TSA can confiscate them.
-
Dry ice is allowed up to 5.5 pounds (2.5 kg) per passenger, but it has to be in a ventilated container and properly labeled.
I once made the rookie mistake of bringing half-frozen gel packs through security, and let’s just say TSA was not impressed. Now, I freeze my packs for a full 48 hours before travel just to be safe.
💡 Pro Tip: If you want your meat to survive a longer trip without risking TSA drama, invest in something like the Arctic Ice Chillin’ Brew reusable packs. They stay colder for longer and tend to stay rock solid past the security checkpoint.
Checked Baggage Rules
For most domestic flights, there’s a lot more flexibility if you check the meat in your luggage.
-
You can use gel packs, frozen water bottles, or even a bit of dry ice (within airline limits).
-
Just make sure your bag can handle the condensation — nobody wants their clothes smelling like raw chicken.
If I’m checking meat, I’ll often use a small soft cooler bag (like the YETI Hopper Flip) inside my suitcase. It adds a layer of insulation and keeps the rest of my stuff safe from any leaks.
International Flights
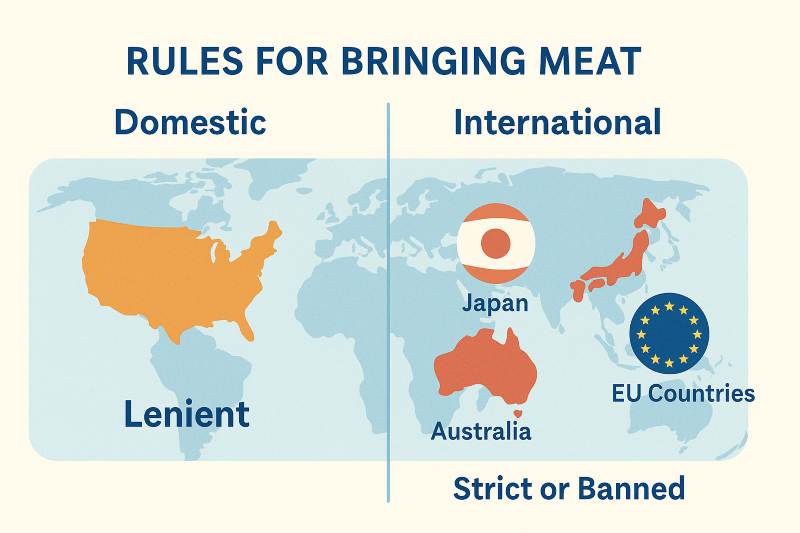
This is where things get tricky. Even if TSA is fine with your frozen meat, the arrival country’s customs might not be. Some countries have no restrictions at all, while others (looking at you, Australia and New Zealand) are extremely strict about meat imports.
We’ll cover these restrictions in detail later, but the short version is: Always check the customs website for your destination before you fly.
Keeping Meat Frozen During Travel
Getting your frozen meat through security is one thing — keeping it frozen until you get to your destination is a whole different challenge. Planes aren’t exactly meat-friendly environments. The cargo hold isn’t as cold as a freezer, and cabin temps can swing depending on where you’re seated.
Over the years, I’ve tried everything from wrapping meat in beach towels (don’t judge) to buying expensive specialty coolers. Some methods worked, others were a total flop. Here’s what I’ve learned.
1. Dry Ice (The Heavy Hitter)
If you’ve got a long-haul flight or your trip involves multiple connections, dry ice is the gold standard for keeping meat rock solid. But it comes with rules:
-
Most airlines limit you to 5.5 pounds (2.5 kg) per person.
-
It must be in a container that allows gas to escape (no airtight coolers).
-
You have to label it with “Dry Ice” and the net weight.
I once flew from Texas to Dubai with frozen brisket packed in dry ice. By the time I landed, it was still like a brick — totally worth the little bit of extra prep.
If you go this route, look for small dry ice packs. They’re easier to handle than big blocks and fit neatly into coolers.
2. Gel & Ice Packs (The TSA-Friendly Option)
When you can’t or don’t want to deal with dry ice, gel packs are your next best bet — especially for domestic flights.
-
Freeze them solid for at least 48 hours before flying.
-
Pack them around the meat so cold air circulates.
I’ve had great results with Arctic Ice Chillin’ Brew packs for day-long trips. For shorter flights, Fit & Fresh XL Cool Coolers work well, and they’re slim enough to tuck into tight carry-on coolers.
3. The Cooler Bag Strategy
Whether you’re using dry ice or gel packs, your container choice makes a huge difference. I used to just toss meat into a standard carry-on, but after a couple of close calls with thawed chicken, I switched to dedicated insulated coolers.
My go-to for carry-on is the YETI Hopper Flip Soft Cooler — it’s compact, leak-proof, and fits easily in an overhead bin. If I’m checking luggage, I like using the Coleman 9-Quart Excursion Cooler inside my suitcase. It’s cheap, lightweight, and adds a nice barrier against condensation.
4. Bonus Hack: Double Seal Everything
No matter what cooler or ice pack setup you use, always double bag your meat. I’m a fan of Hefty Slider Freezer Bags for their thicker plastic and easy-open sliders. They’ve saved me from more than one potential suitcase disaster.
International Restrictions
Here’s where things get interesting — and sometimes a little frustrating. You could have the best packing setup in the world, but if the country you’re flying to doesn’t allow meat imports, all that effort goes straight into the airport trash bin.
I learned this the hard way flying into New Zealand years ago. I’d packed some homemade lamb kebabs for a friend, perfectly frozen and wrapped with ice packs. Customs took one look, shook their heads, and it was game over. New Zealand has very strict biosecurity rules, and meat products are a big no-go unless you have official import paperwork.
Why Some Countries Don’t Allow Meat
It’s not because they’re trying to ruin your barbecue plans. Most countries ban or restrict meat imports to protect against pests, diseases, and invasive species. Even frozen meat can carry bacteria or viruses that local livestock aren’t immune to.
Examples of Strict Countries
-
Australia & New Zealand – Almost all meat is banned unless it’s commercially packaged and certified by an approved source. Even then, you need to declare it and may still lose it.
-
Japan – Meat products require inspection and proper certification from your country of origin.
-
EU Countries – Generally strict about bringing meat from outside the EU unless it’s processed and sealed.
-
United Kingdom – Similar to EU rules post-Brexit.
More Lenient Countries
Some destinations, like parts of the United States, Canada, and Mexico, are a bit more relaxed about bringing in meat — but even then, you usually have to declare it at customs. And trust me, it’s better to declare and have them wave you through than risk a fine.
How to Check Before You Fly
Don’t rely on random online travel forums for this stuff — rules change all the time. Instead:
-
Visit the official customs website of your destination country.
-
Search for “importing meat” or “prohibited food items.”
-
If it’s not clear, email or call their customs authority.
💡 Pro Tip: If you’re traveling internationally and aren’t 100% sure, consider using your frozen meat domestically first (like taking it to a U.S. stop before flying overseas). Or, if it’s a gift, ship it via a specialty food courier that handles customs paperwork.
Step-by-Step Packing Guide for Frozen Meat
I’ve experimented with every method under the sun — from wrapping meat in grocery bags (bad idea) to investing in pro-level travel coolers. Here’s the packing method that works best for me and has kept my meat frozen for flights as long as 18 hours door to door.
Step 1: Freeze Your Meat Solid
This might sound obvious, but don’t just throw it in the freezer the night before. Give it at least 48 hours to get rock solid. I like to spread the pieces out in the freezer so they chill faster and harder.
Step 2: Portion and Double Seal
Divide your meat into meal-size portions so you’re not thawing and refreezing large chunks later.
-
Use Hefty Slider Freezer Bags (my favorite for their durability).
-
Squeeze out as much air as possible before sealing.
-
Put those bags into a second bag to protect against leaks.
Step 3: Choose Your Cooler or Bag
If you’re going carry-on:
-
Use something like the YETI Hopper Flip Soft Cooler — fits overhead, keeps things cold, and doesn’t leak.
If you’re going checked:
-
The Coleman 9-Quart Excursion Cooler inside your suitcase works like a charm.
Step 4: Add Your Cooling Method
-
For short domestic flights: Arctic Ice Chillin’ Brew packs (freeze for at least 48 hours beforehand).
-
For long or multi-leg flights: small packs of dry ice (under 5.5 lbs and labeled properly).
Pack cooling elements evenly around the meat so cold air reaches every side.
Step 5: Fill Empty Space
Air is the enemy of cold. Fill gaps in your cooler with crumpled paper towels or even extra freezer packs. This keeps cold air trapped and reduces thawing.
Step 6: Secure and Label
If using dry ice, follow airline rules — vented container, clear “Dry Ice” label, and net weight.
Even without dry ice, I like to label my cooler “Perishable – Frozen Meat” so baggage handlers know it’s temperature sensitive.
Step 7: Travel Smart
If you have connections, avoid long layovers in hot airports. Try to book flights where you can get from freezer to destination in under 24 hours.
💡 Extra Hack: If you’re flying internationally and can’t bring the meat into your destination, pack it so you can easily remove it at customs without digging through your entire bag. It makes the process way less awkward.
Best Gear for Traveling with Frozen Meat
Over the years, I’ve narrowed down my go-to frozen meat travel kit to a few essentials. They’re not just “travel blogger recommendations” — these are products I’ve personally tested, abused, and still trust.
1. YETI Hopper Flip Soft Cooler
If you’re serious about keeping things cold in carry-on form, this is my MVP. The Hopper Flip is compact, totally leak-proof, and holds temperature like a champ. I’ve flown with it from Miami to Seattle and still had solid frozen meat when I landed. The wide-mouth opening makes packing easy, and it fits perfectly in an overhead bin.
2. Coleman 9-Quart Excursion Cooler
For checked luggage, you don’t need to go fancy. This Coleman is light, affordable, and just the right size to slip inside a suitcase. I’ve used mine for everything from frozen steaks to tubs of homemade ice cream. It’s surprisingly sturdy for the price.
3. Arctic Ice Chillin’ Brew Packs
These are my go-to for domestic flights or same-day travel. They’re slim, refreezable, and last much longer than regular ice packs. I like that they come in different sizes so you can mix and match depending on how much meat you’re carrying.
4. Hefty Slider Freezer Bags
Never underestimate the power of a good freezer bag. The Hefty Sliders are thick, reliable, and actually easy to open and close without tearing the seal — something you’ll be thankful for when you’re repacking on the go.
5. Small Dry Ice Packs
If your trip is longer than 10 hours or involves multiple flights, dry ice is the way to go. I prefer small individual packs from brands — they’re easier to pack around meat than one giant slab.
6. Bonus: Luggage Scale
Not directly meat-related, but if you’re packing a heavy cooler, a portable luggage scale saves you from nasty overweight baggage fees. I like the Etekcity Digital Luggage Scale — small, cheap, and dead accurate.
📌 Pro Tip: I always pack at least one extra gel pack and one extra freezer bag, just in case something leaks or I need to split my load between bags mid-trip.
Conclusion
Bringing frozen meat on a plane isn’t as complicated as it sounds — but it does take a little planning. The key is knowing the rules (TSA, airline, and customs), packing smart, and choosing the right gear so your precious cargo arrives in perfect condition.
For me, it’s always been worth the effort. There’s something special about landing, unpacking a cooler, and knowing that inside are the marinated ribs you’ve been dreaming about, or the family-recipe sausages you can’t get anywhere else. It’s like carrying a little piece of home with you.
If I could leave you with just three golden rules, they’d be:
-
Freeze it rock solid — the colder it starts, the better your chances.
-
Use the right container — coolers are your best friend, whether soft or hard-sided.
-
Know your destination’s rules — because nothing ruins a trip faster than watching customs take your food.
So go ahead, plan that trip, pack that meat, and make your arrival a delicious one. Safe travels — and happy grilling!

Horace Dupuy is a seasoned traveler and luggage reviewer who has spent years flying with both major and regional airlines across the United States and abroad. His first-hand travel experience has taught him exactly what works (and what doesn’t) when it comes to carry-on rules, baggage fees, and packing strategies.
At CarryOnSizes.com, Horace combines personal travel knowledge with in-depth research to provide accurate, up-to-date guides for travelers who want to fly stress-free. When he is not writing about luggage, you will probably find him exploring new destinations with only a compact backpack in tow.